MySQL Permissions Tips
14 Apr 2015Well the last time I posted it was all about MySQL, and I didn't post all I wanted to about MySQL. I've recently learned a fair amount about MySQL permissions which are very handy indeed. Today, I'll walk you through how to set up some basic permissions for a payroll table.
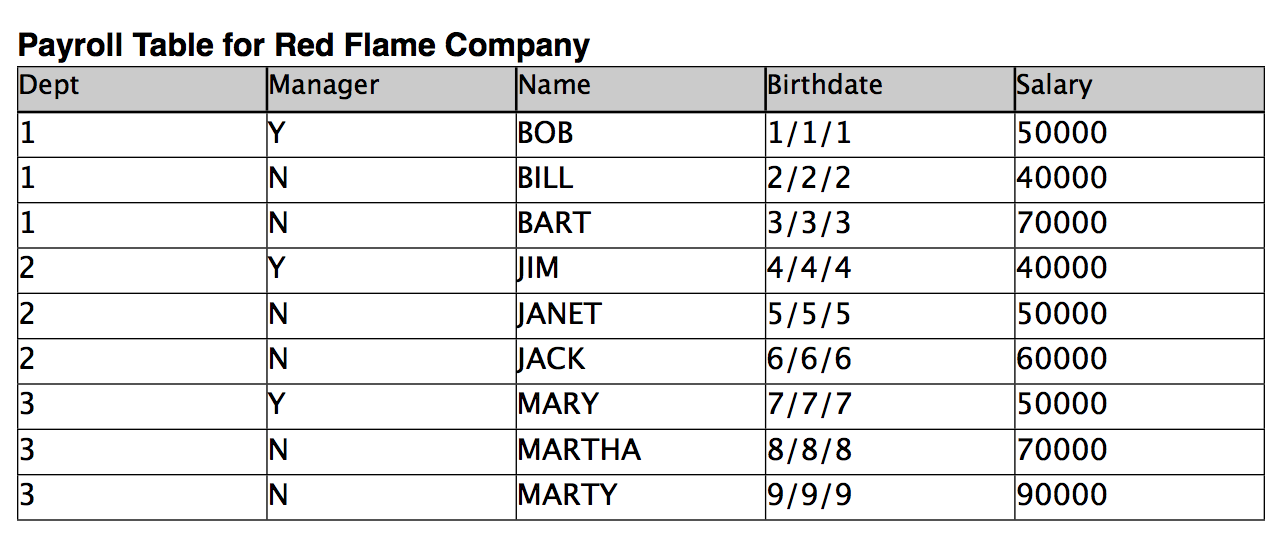
First this is the payroll table that we are going to use:
First step for creating MySQL permissions, is to create a table. We will first need to create a MySQL database to hold our payroll table. To do that all we need to do is type a command inside of MySQL just like this:
DROP DATABASE IF EXISTS RedFlameCompany;
CREATE DATABASE RedFlameCompany;
use RedFlameCompany;
The first line will go through and check if the local MySQL has a database named RedFlameCompany and if it does it drops it. Which means that it will get rid of the MySQL database. The second line means that it creates the database from scratch. The third line then tells MySQL to use the RedFlameCompany database.
Next we will want to create the payroll table so we can give MySQL permissions to see this table:
DROP TABLE IF EXISTS payroll;
CREATE TABLE payroll (
 Dept int(3),
 Manager boolean,
 Name varchar(30),
 Birthdate date,
 Salary int(7)
);
This will also drop the MySQL table if it already exists, then create the MySQL table. Each line is a different column from the original payroll table that we have above.
Next we will actually want to populate the MySQL table with the data from the picture. this is done as easy as:
INSERT into payroll (Dept, Manager, Name, Birthdate, Salary) VALUES
 (1, true, "BOB", "0001-01-01", 50000),
 (1, false, "BILL", "0002-02-02", 40000),
 (1, false, "BART", "0003-03-03", 70000),
 (2, true, "JIM", "0004-04-04", 40000),
 (2, false, "JANET", "0005-05-05", 50000),
 (2, false, "JACK", "0006-06-06", 60000),
 (3, true, "MARY", "0007-07-07", 50000),
 (3, false, "MARTHA", "0008-08-08", 70000),
 (3, false, "MARTY", "0009-09-09", 90000);
Make sure to use the column names that you recently created, and then put your values in in the same order that you listed them as seen above.
Next we will want to create some MySQL views. Views are an easy way to grant MySQL permissions to someone whom you don't want be able to see all the MySQL database, and someone you especially don't want to have the ability to update or insert on your MySQL database. It is a great way to avoid MySQL injections, and create some great MySQL permissions. Let's create a MySQL view named dept1, dept2, and dept3 so we can give every worker access to see only their department:
CREATE VIEW dept1 AS
 SELECT
  Dept,
  Manager,
  Name,
  Birthdate,
  Salary
 FROM
  payroll
 WHERE
  dept = 1;

CREATE VIEW dept2 AS
 SELECT
  Dept,
  Manager,
  Name,
  Birthdate,
  Salary
 FROM
  payroll
 WHERE
  dept = 2;

CREATE VIEW dept3 AS
 SELECT
  Dept,
  Manager,
  Name,
  Birthdate,
  Salary
 FROM
  payroll
 WHERE
  dept = 3;
Now that we have created the MySQL views, we can start to create all the users and grant them their MySQL permissions. To create a user it is very easy:
CREATE user Bob identified by 'password';
CREATE user Bill identified by 'password';
CREATE user Bart identified by 'password';
CREATE user Jim identified by 'password';
CREATE user Janet identified by 'password';
CREATE user Jack identified by 'password';
CREATE user Mary identified by 'password';
CREATE user Martha identified by 'password';
CREATE user Marty identified by 'password';
This will create all the users that are specified above, and will also assign them a password which in this case is password for everyone.
To grant MySQL permissions we need to decide what MySQL permissions we want to assign. If we want to assign MySQL permissions to do basically anything to the database we would assign them as so:
GRANT ALL PRIVILEGES ON *.* to Mary;
This will give Mary MySQL permissions to do anything she pleases to the database.
If we want to give UPDATE MySQL permissions to Bob for only certain MySQL database columns we can do so just like this:
GRANT UPDATE(Dept,Manager,Name,Birthdate) on RedFlameCompany.dept1 to Bob;
This will give Bob MySQL permissions to UPDATE the Dept, Manager, Name, and Birthdate columns on the dept1 MySQL table.
What if we want to grant view only MySQL permissions to someone? That will be as easy as:
GRANT SELECT(Dept,Manager,Name,Birthdate) on RedFlameCompany.dept1 to Bill;
Now Bill has MySQL permissions to SELECT or view the Dept, Manager, Name, and Birthdate columns on the dept1 MySQL table.
All we have left to do is to check the MySQL permissions of a user. We can do that with the SHOW GRANTS command:
SHOW GRANTS For 'Mary';
Which will output:
--------------
SHOW GRANTS For 'Mary'
--------------

+--------------------------------------------------------------------------------------------------------------+
| Grants for Mary@%                                                                                            |
+--------------------------------------------------------------------------------------------------------------+
| GRANT ALL PRIVILEGES ON *.* TO 'Mary'@'%' IDENTIFIED BY PASSWORD '*2470C0C06DEE42FD1618BB99005ADCA2EC9D1E19' |
+--------------------------------------------------------------------------------------------------------------+
1 row in set (0.00 sec)
This shows that Mary truly does have MySQL permissions to do anything she wants in the MySQL database.
The rest of my MySQL code can be found here. If you have any questions or comments feel free to leave a comment below.
If you liked this post, you can share it with your followers or follow me on Twitter!
Comments